You're probably wondering, "What happened to the third day?" The third day was spent learning how to compose and create using Photoshop before you even get out a piece of paper. It was full of informative and interesting facts and techniques. But I can't go into that - suffice it to say it could have been a workshop all on it's own and Nick shared how he creates some of his interesting compositions using various photos in a type of montage/overlapping style (and I intend to use this "trick" for my own compositions in the future).
Day Four began with a demo of a simple composition, with Nick talking about drawing and painting buildings that have more personality, using concave lines instead of straight or convex lines. I did not do a good job on my own little "sketch." I never do buildings or landscapes or really create anything without a photo reference, so that's my excuse for doing so poorly. I know it's something I should work on...but there are so many other areas I want to improve in that this will be put on the back burner. I did appreciate what he was trying to do for us and how this took us back to basic composition skills that should be easy to use on every painting (but it wasn't that easy for me). There were about 1/2 the class who benefited from this a lot. As Nick says - you always get a mix of beginners through advanced in these workshops and you have to gear your demos and exercises for all members of the group so sometimes the advanced feel like they are far beyond that while sometimes the beginners feel they don't understand what's being done. It's a hard mix to get just right - maybe like a good martini?
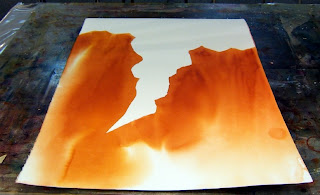
We immediately went into a big, poured painting! A canyon began with a basic contour drawing of the shapes, and Nick poured a gorgeous mix of Quinacridone Gold + Transparent Brown. Yummy colors!


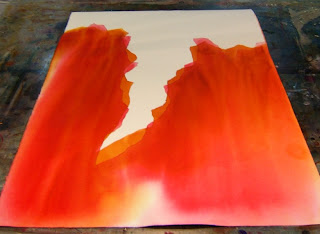
He called this process "Progressive Composition." And that meant, if you had elements of the composition you didn't like in the first drawing and pour, you adjusted them in the second, and third, and fourth pours. Since there were shapes he didn't like in the first pour, he cut in with some lines and cut out with some lines before doing the second pour with Alizarin Crimson. What a bold color!!! But see how some of that gold shows? So you get the first color showing through in areas, the second color pure (where you go outside the first lines) and you have a third color when the first and second layers merge.

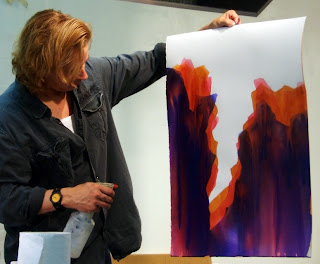
Normally, Nick would have painted four layers but due to time constraints he went right into a bold, juicy dark color (a mix of a blue and Dioxizine Purple that is strong!!!). Again, cutting in some areas and outside some areas to adjust the composition even more. And you have the beginning of a canyon painting.
As that was drying, he began doing a little demo of the koi in water (similar to the DVD he has out) for those who wanted to see that "batik" technique up close and personal. I tell you, it's all a matter of timing - he has it...I don't!! ha ha So more practice to get this right for me so I don't wash away all the paint...or none of the paint. Time to get out the timer and see how long it takes for the optimum amount of the paint to stay on the paper with the optimum amount still wet enough to wash away.

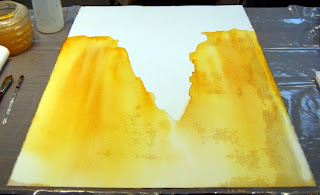
This is my first canyon pour...I didn't mix anything in with my Quin Gold so it's pure Quin Gold and I got a bad piece of Arches hot press (see the right edge and those blotches?) that worked out okay on this because it's just more texture. But it took forever to dry and you dry each layer before starting with the next layer. I don't have a photo of the second pour for me but I'll take a photo of where I am on this now (I've worked on it here at home and have something...I think...worth sharing).
9 comments:
Thank you for sharing about the Nick Simmons workshop-I love his work! I'm thinking of ordering his CD.
You'll learn a lot of his techniques in the DVD, Jane, so do get it. And he's going to be coming out with another soon showcasing other techniques and things :)
Anxious to see how the canyon piece developed for you Rhonda. Thank goodness you gave me the formula on the final layer. Had not written that down and couldnt remember anything but the diox purple.
What a great lot of posts, Rhonda! Excellent lists! Your lemons turned out perfectly, love your Koi and I really appreciate all the information you've shared from the Simmons workshop. What a great opportunity!
Hey Rhonda what a lucky girl being taught by this great guy of such freedom and light. Your geisha is magnificent and as for all the canyon process, it was a revelation even to me who pours, sticks and plays to her hearts content. What a magical workshop and teaching post.
I really admire Nick's bold pours. I can't wait to see what you will do with the canyon painting. Thank you for sharing all of this with us.
Sonya, Christiane and Joan, I'm afraid I've let the canyon get away from me but have an idea to try to save it from total ruin! ha ha I will share - good or bad (you know me, I have no shame!)
Suzanne, glad you are enjoying it. Only the koi stuff left and you can get that on his DVD, but I'll share the one he did in the workshop.
I highly recommend him - take his workshop, go with an open mind to listen, learn, laugh and be pushed past your limits a bit :) I know he's often called the Bad Boy of Watercolor but to me he's one of the most giving instructors, telling you all the "secrets" others might hold back, and entertaining you in the process with great stories (some are even true :)
Rhonda, I'm way behind in blog reading, but finally catching up -- thanks for this whole series of posts on Nick's workshop -- very interesting and educational!! I like your koi painting -- and don't feel bad about the others -- most of the work I ever did in workshops was a "learning experience" at best!! ;-D
Chris, you must be a busy lady lately but glad to hear from you - hope you are fine as frog hair :)
Post a Comment